How to Properly Set a Table and Where do the Glasses Go?
As I try to teach the children to set the table, they are often confused by what goes where. So, when I found this table setting picture in a some junk mail I received, I decided it was perfect for teaching everyone how to properly set the table. It has also gone a long way toward helping them know what flatware to use when we are eating out.
Growing up, we always set the table this way for every meal. My mother's dinner table always looked beautiful. I am trying to pass this along to my children, but it is not without it's problems. Whether I plan on using each piece of flatware or not, I still insist on the table being set properly. Unless we are just having a quick meal of hotdogs and potato chips, that is!
This basic table setting is appropriate for most every occasion.

A. Salad plate
B. Napkin
C. Salad fork
D. Dinner fork
E. Dinner plate F. Knife
G. Teaspoon
H. Soup spoon
I. Water glass
J. Cup and saucer
The flatware is arranged around the plate in the order in which it will be used. If a salad is to be served, the salad fork is placed to the left of the dinner fork. The salad fork can be eliminated if no salad is server or placed to the right of the dinner fork and used as a dessert fork if appropriate. (The dessert fork can also be brought to the table when dessert is served.) If desired, a wine glass can be added between the water glass and the coffee cup.
http://www.wecosoft.com/geniescorner/kitchen/settable.asp
How to Set the Table
Whether your dinner is very formal or not so formal, there are a few basic guidelines to setting a table.
Instructions:
• STEP 1: Figure out how many guests will be attending. If several children will be in attendance, consider having a children's table. If you would like the children at the main table, consider booster chairs if the children are small.
• STEP 2: Determine where everyone should sit. For convenience, the cook may want to sit near the kitchen door. Parents should sit next to their children. If there is a male guest, he is traditionally seated on the hostess's right. A female guest is traditionally seated on the host's right. For large parties, determine who would interact best with each other. Some people like to alternate between men and women, but this isn't necessary. You may want to use name cards to avoid everyone rushing for a seat at the last minute.
• STEP 3: Decide if you will use a tablecloth. If the tablecloth is white damask, you will need a pad under it to prevent it from slipping. Also, the middle crease should be arranged so that it runs in a straight and unwavering line down the center of the table from head to foot. When the tablecloth is on, it should hang down about a foot and a half if it is a seated dinner. If it is a buffet dinner, it should hang down to the floor.
• STEP 4: Set the table once you've adjusted the tablecloth. Begin by folding napkins and placing them in the center of each diner's place.
• STEP 5: Place the large dinner fork to the left of the napkin and the smaller salad fork to the left of the dinner fork.
• STEP 6: Place a salad plate to the left of the forks. The dinner plate should not be on the table when guests sit down.
• STEP 7: Place a knife to the right of the napkin, with the cutting edge toward the plate. For chicken or a game bird, you might want to use a steak knife.
• STEP 8: Put out two spoons if you're serving both soup and dessert. The small dessert spoon should be placed to the right of the knife. Place the soup spoon to the right of the dessert spoon. (You can also wait and bring the dessert spoons out just before dessert.)
• STEP 9: Place a bread plate with a butter knife (if you have them) about 2 inches above the forks.
• STEP 10: Place a water goblet about 2 inches above the knife. To the right of the goblet and slightly closer to the dinner guest, place a wine glass.
• STEP 11: Place a cup and saucer, if you're serving coffee or tea, to the right of the setting, with a coffee spoon on the right side of the saucer.
http://www.ehow.com/how_8380_set-table.html
What Goes Where on the Table and Which Glasses go With What Drinks?
Real easy, the etiquette experts tell us. The general rule with utensils is to start from the outside of your place setting, and work your way toward the service plate (the main meal plate): soup spoon first, then fish knife and fork, then service knife and fork.
Growing up, we always set the table this way for every meal. My mother's dinner table always looked beautiful. I am trying to pass this along to my children, but it is not without it's problems. Whether I plan on using each piece of flatware or not, I still insist on the table being set properly. Unless we are just having a quick meal of hotdogs and potato chips, that is!
This basic table setting is appropriate for most every occasion.
A. Salad plate
B. Napkin
C. Salad fork
D. Dinner fork
E. Dinner plate F. Knife
G. Teaspoon
H. Soup spoon
I. Water glass
J. Cup and saucer
The flatware is arranged around the plate in the order in which it will be used. If a salad is to be served, the salad fork is placed to the left of the dinner fork. The salad fork can be eliminated if no salad is server or placed to the right of the dinner fork and used as a dessert fork if appropriate. (The dessert fork can also be brought to the table when dessert is served.) If desired, a wine glass can be added between the water glass and the coffee cup.
http://www.wecosoft.com/geniescorner/kitchen/settable.asp
How to Set the Table
Whether your dinner is very formal or not so formal, there are a few basic guidelines to setting a table.
Instructions:
• STEP 1: Figure out how many guests will be attending. If several children will be in attendance, consider having a children's table. If you would like the children at the main table, consider booster chairs if the children are small.
• STEP 2: Determine where everyone should sit. For convenience, the cook may want to sit near the kitchen door. Parents should sit next to their children. If there is a male guest, he is traditionally seated on the hostess's right. A female guest is traditionally seated on the host's right. For large parties, determine who would interact best with each other. Some people like to alternate between men and women, but this isn't necessary. You may want to use name cards to avoid everyone rushing for a seat at the last minute.
• STEP 3: Decide if you will use a tablecloth. If the tablecloth is white damask, you will need a pad under it to prevent it from slipping. Also, the middle crease should be arranged so that it runs in a straight and unwavering line down the center of the table from head to foot. When the tablecloth is on, it should hang down about a foot and a half if it is a seated dinner. If it is a buffet dinner, it should hang down to the floor.
• STEP 4: Set the table once you've adjusted the tablecloth. Begin by folding napkins and placing them in the center of each diner's place.
• STEP 5: Place the large dinner fork to the left of the napkin and the smaller salad fork to the left of the dinner fork.
• STEP 6: Place a salad plate to the left of the forks. The dinner plate should not be on the table when guests sit down.
• STEP 7: Place a knife to the right of the napkin, with the cutting edge toward the plate. For chicken or a game bird, you might want to use a steak knife.
• STEP 8: Put out two spoons if you're serving both soup and dessert. The small dessert spoon should be placed to the right of the knife. Place the soup spoon to the right of the dessert spoon. (You can also wait and bring the dessert spoons out just before dessert.)
• STEP 9: Place a bread plate with a butter knife (if you have them) about 2 inches above the forks.
• STEP 10: Place a water goblet about 2 inches above the knife. To the right of the goblet and slightly closer to the dinner guest, place a wine glass.
• STEP 11: Place a cup and saucer, if you're serving coffee or tea, to the right of the setting, with a coffee spoon on the right side of the saucer.
http://www.ehow.com/how_8380_set-table.html
What Goes Where on the Table and Which Glasses go With What Drinks?
Real easy, the etiquette experts tell us. The general rule with utensils is to start from the outside of your place setting, and work your way toward the service plate (the main meal plate): soup spoon first, then fish knife and fork, then service knife and fork.
A. Serviette (napkin)
B. Service plate
C. Soup bowl on plate
D. Bread and butter plate with butter knife
E. Water glass
F. White wine
G. Red wine
H. Fish fork
I. Dinner Fork
J. Salad fork
K. Service knife
L. Fish knife
M. Soup spoon
N. Dessert spoon and cake fork.
Note that it is often recommended that the salad fork (J) is placed to the left of the dinner fork (I). However, in this formal setting the dinner fork is placed to be used before the salad fork because it is suggested that the guest awaits the main meal before helping him/herself to the salad.
What to do When
When to start eating:
Despite what mother told you, culinary experts say you do not always have to wait for everyone to begin - start eating hot food when it is served. For cold foods or buffets, wait for the host to announce dinner, and wait until the head guest starts dishing.
Foods you can get by hand:
1. Bread: break slices of bread, rolls and muffins in half or into small pieces by hand before buttering.
2. Bacon: if there's fat on it, eat it with a knife and fork. If it is crisp, crumble it with a fork and eat with your fingers.
3. Finger meals: Follow the cue of your host. If finger meals are offered on a platter, place them on your plate before putting them into your mouth.
4. Foods meant to be eaten by hand: corn on the cob, spareribs, lobster, clams and oysters on the half shell, chicken wings and bones (in informal situations), sandwiches, certain fruits, olives, celery, dry cakes and cookies.
Removing inedible items from your mouth:
1. Olive pits: drop delicately into your palm before putting them onto your plate.
2. Chicken bone: use your fork to return it to the plate.
3. Fish bones: remove with your fingers.
4. Bigger pieces: bigger bones or food you don't appreciate you should surreptitiously spit into your serviette (napkin), so that you can keep it out of sight.
Which Glasses go With What Drinks
Wine connoisseurs agree that each type of wine needs a particular type of glass to bring out the distinctive bouquet. Using a narrow glass for a rich Burgundy, for example, won't allow enough room to swirl it around in, and it's the swirl that brings out its bouquet. The glass also needs to taper properly toward the top so that it captures the bouquet yet allows for sipping. In general, the stem of a glass should be long enough to keep hands from touching the bowl, which can affect the wine's temperature, and therefor its bouquet.
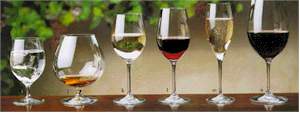
From left to right the glasses are: Water, Brandy, White wine, Pinor Noir Burgundy, Sparkling wine, Red wine
a. Water: full body glass with short stem. Hold the glass by the stem to preserve its chill.
b. Brandy: brandy snifter. Roll the snifter between both hands and then cup it in one hand - warming the glass brings out the bouquet in brandy.
c. White wine: slightly smaller glass with wider bowl to capture the bouquet. Hold the glass by the stem to preserve its chill.
d. Burgundy Reds and Pinot Noirs: a wide bowl to bring out their complexity. The glass is slightly taller than the white wine glass.
e. Champagne: a narrow fluted glass, which reduces the wine's surface area and keep the bubbles from dissipating.
f. Red wine: the bigger of the wine glasses. Hold the glass at the bottom of the bowl where it meets the stem.
Now that you have the correct table setting and the proper wine glasses, see which wines go best with what food, and then make sure you get the right person to share it with!
http://www.didyouknow.cd/info/tablesettings.htm
You will notice that there are two different ways to set the table. Use the one you feel most comfortable with.
posted by Sands @ 6:18 PM
0 comments
![]()
![]()


0 Comments:
Post a Comment
<< Home